文章目录
前言
对于HTTP/3一直有个执念:前段时间(9月份)了解HTTP/3后,在本地虚拟机测试,始终达不到要求;但又由于没有单独的多余服务器测试(主要是这台服务器陪伴已久,里面的数据以及环境都比较复杂,测试难度比较高),导致一直搁置着。
最近新申请了个域名,搭配服务器也比较优惠,就搞了台国内基础配置的云服务器。这样万事俱备,直接开干!
成果
网站预览:HTTP/3 Adventure
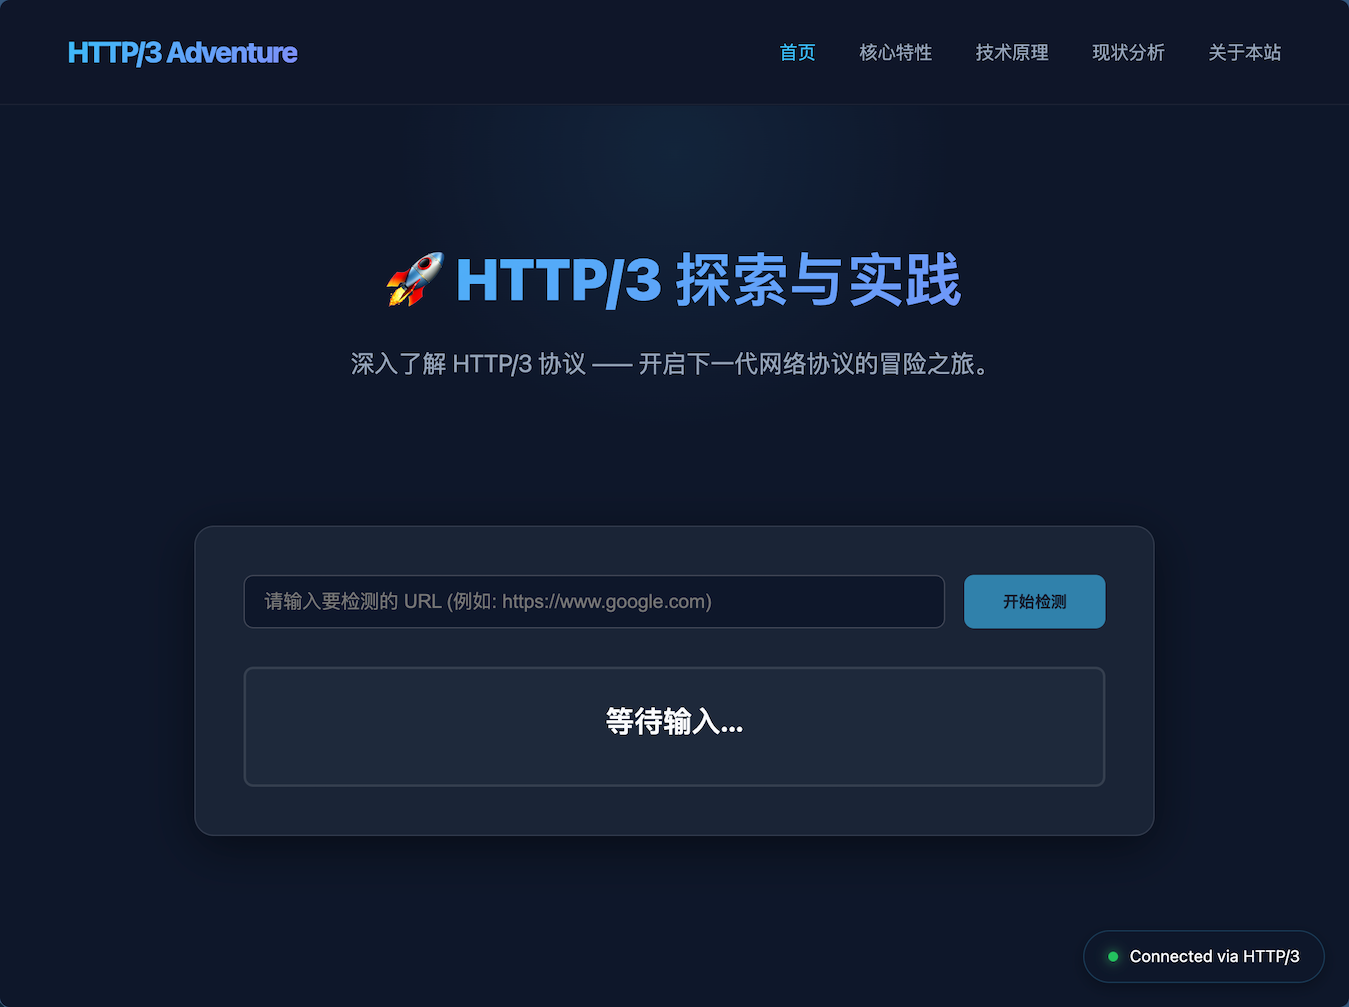

网站设计
这个网站90%基于Google Gemini设计。
当时只是想简单设计个页面,需求也就寥寥几个字:
我准备做一个HTTP/3的网站,帮我写一个首页的html文件,大致介绍网站的介绍,功能,以及其他一些http/3方面的支持,页面做美观大气
分别发给了Google Gemini以及ChatGPT:
-
Gemini设计的页面基本和现在看到的区别不大;
-
ChatGPT设计的页面非常简单,如果不对比Gemini给的页面,那么还能接受,毕竟只是想简单测试一下,对比之后就显得粗糙异常,封建时代城里人与农村人的感觉,落后好几个时代
没有对比,就没有伤害。
当然,也侧面验证了一个事实,现在的Gemini真的在AI领域No.1。(⌚️11/30/2025)
心路历程:
最开始,只想拿个检测页面看看HTTP/3的支持程度;
看了Gemini的界面,感觉好好设计一下可以当个网站玩玩;
逐步完善各个页面;
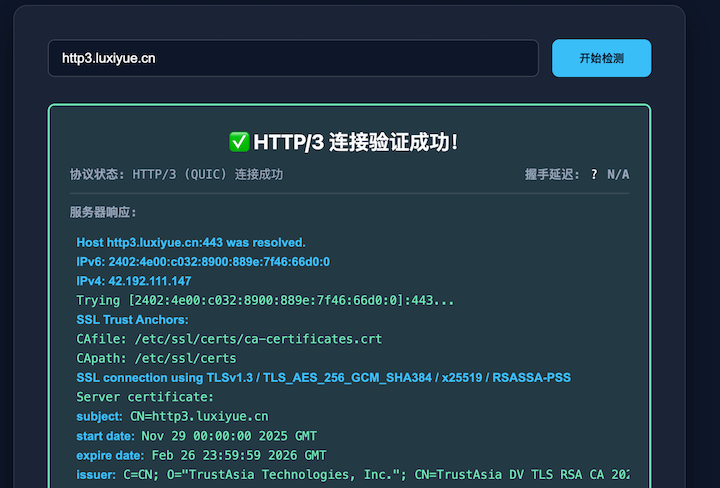
增加网站的HTTP/3检测功能(本来是纯前端页面,现在又要加后端),而且后端需要基于支持HTTP/3的cURL;
最终,就是现在的样子。
PS:为什么必须通过后端检测网站是否支持HTTP/3?
前端页面的检测只能获取到网站的头部信息,即: Alt-Svc 'h3=":443"; ma=86400' ,但是有些网站即使有这个头部信息,也并非真正意义上的支持HTTP/3,因此想要完全确保HTTP/3的检测真实有效,就只能通过支持HTTP/3的cURL来获取网站的信息。
基础环境
服务器: Ubuntu Server (2核 CPU / 2GB RAM,国内机房)
Web服务器: 基于目前最新的Nginx 1.29.3版本
TLS库: BoringSSL(用于编译Nginx)
语言: 前端 HTML + 后端 PHP
cURL: 基于OpenSSL、nghttp3、ngtcp2编译以支持HTTP/3
网站源码
网站源码已经分享出来,想尝试部署的同学可以跟着以下搭建步骤进行部署。
网站源码地址:GitHub - luuaiyan/HTTP-3-Website: HTTP/3个人网站的代码,带有HTTP/3网站测试功能
全程无坑,如果不改编译路径(/root/nginx-build)以及网站路径(/var/www/http)的话,全程复制命令就行。
搭建步骤
为了方便操作,相关程序均下载/克隆至 /root/nginx-build 目录。
一、环境部署
安装编译工具及相关依赖:
sudo apt install -y git gcc make libpcre3 libpcre3-dev zlib1g-dev libssl-dev libbrotli-dev libzstd-dev cmake g++ build-essential autoconf libtool pkg-config libpsl-dev二、基于BoringSSL编译Nginx
首先,编译BoringSSL:
mkdir /root/nginx-build
cd /root/nginx-build
git clone https://gitee.com/mirrors/boringssl.git  #  BoringSSL
# git clone https://boringssl.googlesource.com/boringssl  #  也可以克隆官方链接的仓库

cd boringssl
mkdir build && cd build
cmake .. -DCMAKE_BUILD_TYPE=Release
make -j$(nproc)
然后,编译Nginx:
cd /root/nginx-build
wget https://nginx.org/download/nginx-1.29.3.tar.gz  #  自行下载最新版的Nginx
tar -zxvf nginx-1.29.3.tar.gz  #  解压
编译配置:
cd nginx-1.29.3
./configure \
    --prefix=/etc/nginx \
    --sbin-path=/usr/sbin/nginx \
    --conf-path=/etc/nginx/nginx.conf \
    --http-client-body-temp-path=/var/cache/nginx/client_body_temp \
    --http-proxy-temp-path=/var/cache/nginx/proxy_temp \
    --http-fastcgi-temp-path=/var/cache/nginx/fastcgi_temp \
    --http-scgi-temp-path=/var/cache/nginx/scgi_temp \
    --http-uwsgi-temp-path=/var/cache/nginx/uwsgi_temp \
    --error-log-path=/var/log/nginx/error.log \
    --http-log-path=/var/log/nginx/access.log \
    --pid-path=/run/nginx.pid \
    --lock-path=/run/nginx.lock \
    --modules-path=/usr/lib/nginx/modules \
    --with-http_realip_module \
    --with-http_addition_module \
    --with-http_sub_module \
    --with-http_dav_module \
    --with-http_flv_module \
    --with-http_mp4_module \
    --with-pcre \
    --with-pcre-jit \
    --with-http_gunzip_module \
    --with-http_gzip_static_module \
    --with-http_stub_status_module \
    --with-http_random_index_module \
    --with-http_secure_link_module \
    --with-http_degradation_module \
    --with-http_slice_module \
    --with-http_auth_request_module \
    --with-mail \
    --with-mail_ssl_module \
    --with-stream \
    --with-stream_realip_module \
    --with-stream_ssl_module \
    --with-stream_ssl_preread_module \
    --with-http_ssl_module \
    --with-http_v2_module \
    --with-http_v3_module \
    --with-cc-opt="-I/root/nginx-build/boringssl/include" \
    --with-ld-opt="-L/root/nginx-build/boringssl/build -L/root/nginx-build/boringssl/build/crypto -lssl -lcrypto -lstdc++ -lpthread -lm" \
    --user=www-data \
    --group=www-data \
    --with-threads \
    --with-file-aio \
    --with-debug
完成编译:
make -j$(nproc)
make install
通过 nginx -V查看输出:
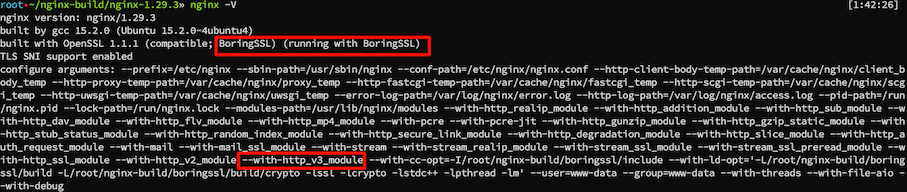
配置Nginx:
mkdir -p /var/cache/nginx/client_body_temp # 缺少这个临时目录创建Nginx系统服务:
vim /etc/systemd/system/nginx.service内容为:
[Unit]
Description=A high performance web server and a reverse proxy server
Documentation=man:nginx(8)
After=network-online.target remote-fs.target nss-lookup.target
Wants=network-online.target

[Service]
Type=forking
PIDFile=/run/nginx.pid
ExecStartPre=/usr/sbin/nginx -t -q -g 'daemon on; master_process on;'
ExecStart=/usr/sbin/nginx -g 'daemon on; master_process on;'
ExecStartPost=/bin/sleep 0.1
ExecReload=/usr/sbin/nginx -g 'daemon on; master_process on;' -s reload
ExecStop=-/sbin/start-stop-daemon --quiet --stop --retry QUIT/5 --pidfile /run/nginx.pid
TimeoutStopSec=5
KillMode=mixed

[Install]
WantedBy=multi-user.target
加载并启动Nginx:
systemctl enable nginx  # 开机启动
systemctl start nginx  # 启动
systemctl status nginx  # 查看状态
三、安装PHP-FPM
add-apt-repository ppa:ondrej/php
apt install php8.5-fpm
四、配置和编译支持HTTP/3的cURL
定义以下路径变量:
| 变量名 | 路径 | 作用 |
|---|---|---|
OPENSSL_PREFIX |
/root/nginx-build/openssl/build |
OpenSSL 3.6.0 的安装目录 |
NGHTTP3_PREFIX |
/root/nginx-build/nghttp3/build |
nghttp3 的安装目录 |
NGTCP2_PREFIX |
/root/nginx-build/ngtcp2/build |
ngtcp2 的安装目录 |
CURL_PREFIX |
/root/nginx-build/curl/install |
cURL 的最终安装目录 |
具体的编译步骤:
第 1 步:配置和编译 OpenSSL
# 1. 切换到主构建目录
cd /root/nginx-build
# 2. 克隆 OpenSSL
git clone --depth 1 -b openssl-3.6.0 https://github.com/openssl/openssl openssl

# 3. 编译 OpenSSL
cd openssl
./config --prefix=/root/nginx-build/openssl/build --libdir=lib
make -j$(nproc)
make install
第 2 步:编译 nghttp3
# 1. 切换到主构建目录
cd /root/nginx-build
# 2. 克隆 nghttp3
git clone https://github.com/ngtcp2/nghttp3
cd nghttp3

# 3. 准备配置
git submodule update --init
autoreconf -fi

# 4. 配置 nghttp3
./configure --prefix=/root/nginx-build/nghttp3/build --enable-lib-only
make -j$(nproc)
make install
第 3 步:编译 ngtcp2
# 1. 切换到主构建目录
cd /root/nginx-build
# 2. 克隆 ngtcp2
git clone https://github.com/ngtcp2/ngtcp2
cd ngtcp2

# 3. 准备配置
autoreconf -fi

# 4. 配置 ngtcp2 (关键步骤:设置 PKG_CONFIG_PATH 和 LDFLAGS)
OPENSSL_PREFIX=/root/nginx-build/openssl/build
NGHTTP3_PREFIX=/root/nginx-build/nghttp3/build

./configure \
  PKG_CONFIG_PATH="$OPENSSL_PREFIX/lib/pkgconfig:$NGHTTP3_PREFIX/lib/pkgconfig" \
  LDFLAGS="-Wl,-rpath,$OPENSSL_PREFIX/lib" \
  --prefix=/root/nginx-build/ngtcp2/build \
  --enable-lib-only \
  --with-openssl

make -j$(nproc)
make install
第 4 步:编译支持 HTTP/3 的 cURL
# 1. 切换到主构建目录
cd /root/nginx-build
# 2. 克隆 cURL
git clone https://github.com/curl/curl
cd curl

# 3. 准备配置
autoreconf -fi

# 4. 配置 cURL
OPENSSL_PREFIX=/root/nginx-build/openssl/build
NGTCP2_PREFIX=/root/nginx-build/ngtcp2/build

LDFLAGS="-Wl,-rpath,$OPENSSL_PREFIX/lib" \
PKG_CONFIG_PATH="$NGTCP2_PREFIX/lib/pkgconfig" \
./configure \
  --prefix=/root/nginx-build/curl/install \
  --with-openssl=$OPENSSL_PREFIX \
  --with-nghttp3=$NGHTTP3_PREFIX \
  --with-ngtcp2

make -j$(nproc)
make install
验证
运行以下命令来确认 cURL 是否支持 HTTP/3:
/root/nginx-build/curl/install/bin/curl -V在输出中,应该看到 Features: ... HTTP3 ...,说明编译成功了!

参考资料:HTTP/3 with curl官方文件
五、修改 PATH 环境变量 (推荐)
可以将上述自定义安装目录添加到 PATH 环境变量的最前面。这样,直接输入 curl 时,系统会优先找到该版本,但不会影响其他系统工具(因为它们通常使用绝对路径)。
# 临时生效(只对当前终端会话有效)
export PATH="/root/nginx-build/curl/install/bin:$PATH"

# 永久生效(编辑 ~/.bashrc 或 ~/.zshrc 文件)
echo 'export PATH="/root/nginx-build/curl/install/bin:$PATH"' >> ~/.bashrc
source ~/.bashrc

# 验证:现在直接输入 curl 应该显示您的新版本
curl -V系统层使用,如果平时在系统中不需要http3的curl功能,可以不用添加。
六、部署 cURL 到 Nginx/PHP 环境
一般默认 PHP-FPM 进程是以 www-data 用户运行的,但是系统层的权限为 root ,无法直接调用。
因此,计划将 cURL 部署到 /var/www/http3-curl 目录。
第一步:文件部署和权限设置
1.1 移动文件和创建目录
将 cURL 可执行文件 (curl) 及其所有依赖的动态链接库(libcurl.so, OpenSSL, QUIC 库)复制到目标目录。
# 1. 定义源路径 (您的编译安装目录)
CURL_INSTALL_DIR="/root/nginx-build/curl/install"
OPENSSL_LIB_SOURCE="/root/nginx-build/openssl/build/lib"
NGTCP2_LIB_SOURCE="/root/nginx-build/ngtcp2/build/lib"
NGHTTP3_LIB_SOURCE="/root/nginx-build/nghttp3/build/lib"

# 2. 定义目标部署路径
TARGET_DIR="/var/www/http3-curl"
PHP_USER="www-data"

# 3. 创建目录结构
sudo mkdir -p $TARGET_DIR/bin
sudo mkdir -p $TARGET_DIR/lib

# 4. 复制 cURL 可执行文件
# 这是 PHP 脚本中调用的程序路径
sudo cp $CURL_INSTALL_DIR/bin/curl $TARGET_DIR/bin/

# 5. 复制 cURL 动态链接库 (libcurl.so)
# 这一步解决了 'undefined symbol' 错误
sudo cp $CURL_INSTALL_DIR/lib/libcurl.so* $TARGET_DIR/lib/

# 6. 复制所有依赖的动态链接库 (OpenSSL, ngtcp2, nghttp3)
sudo cp $OPENSSL_LIB_SOURCE/*.so* $TARGET_DIR/lib/
sudo cp $NGTCP2_LIB_SOURCE/*.so* $TARGET_DIR/lib/
sudo cp $NGHTTP3_LIB_SOURCE/*.so* $TARGET_DIR/lib/
1.2 设置文件所有权和权限
确保 PHP-FPM 运行用户 (www-data) 对这些文件拥有读和执行权限。
# 1. 设置所有者为 PHP 运行用户
sudo chown -R $PHP_USER:$PHP_USER $TARGET_DIR

# 2. 确保目录和文件有执行权限
sudo chmod -R 755 $TARGET_DIR
第二步:PHP 后端调用配置 (check.php)
在 check.php 脚本中,不仅需要调用正确的 cURL 路径,更关键的是要设置 LD_LIBRARY_PATH 环境变量,告诉系统去哪里加载那些非标准的动态链接库。
2.1 完整的 check.php 脚本
确保 /var/www/http3/check.php 文件内容如下所示:
<?php
/**
 * HTTP/3 真实连接验证后端 API
 * 文件路径: /var/www/http3/check.php
 */

header('Content-Type: application/json');

// ----------------------------------------------------
// 路径定义:使用第一步部署的新路径
// ----------------------------------------------------
$curl_path = '/var/www/http3-curl/bin/curl';
$lib_path = '/var/www/http3-curl/lib';

$url = isset($_GET['url']) ? trim($_GET['url']) : '';

if (empty($url) || !preg_match('/^https:\/\//i', $url)) {
    http_response_code(400);
    echo json_encode(['status' => 'error', 'message' => 'URL无效,必须以 https:// 开头。']);
    exit;
}

// 权限和可执行性检查
if (!is_executable($curl_path)) {
    http_response_code(500);
    echo json_encode(['status' => 'error', 'message' => '服务器错误:cURL 工具无法执行。请检查文件权限和用户所有权。']);
    exit;
}

// ----------------------------------------------------
// 核心逻辑:设置环境变量并执行 cURL 命令
// ----------------------------------------------------

// 关键:通过 LD_LIBRARY_PATH 告诉系统在哪里找到非标准路径下的 OpenSSL/QUIC 库
$cmd = "LD_LIBRARY_PATH=" . escapeshellarg($lib_path) . " " .
       escapeshellarg($curl_path) . " -I --http3 --silent " . escapeshellarg($url) . " 2>&1";

$output = shell_exec($cmd);

// ----------------------------------------------------
// 解析 cURL 输出 (与之前提供的逻辑相同)
// ----------------------------------------------------
$is_http3_success = false;
$response_status_message = '未知';
$raw_headers = '';

if (strpos($output, 'HTTP/3') !== false && (strpos($output, '200') !== false || strpos($output, '302') !== false)) {
    $is_http3_success = true;
    $response_status_message = 'HTTP/3 (QUIC) 连接成功';

} elseif (strpos($output, 'HTTP/2') !== false || strpos($output, 'HTTP/1.1') !== false) {
    $is_http3_success = false;
    $response_status_message = '连接成功,但回退到 TCP 协议 (H3 尝试失败)';

} elseif (preg_match('/HTTP\/\d.\d\s+(\d+)/', $output, $matches)) {
    $is_http3_success = false;
    $response_status_message = "连接成功,状态码: " . $matches[1] . " (非 H3)";

} else {
    $is_http3_success = false;
    $response_status_message = '连接失败或 QUIC 握手错误 (请检查 UDP 443)';
}

$header_start = strpos($output, 'HTTP/');
if ($header_start !== false) {
    $raw_headers = trim(substr($output, $header_start));
} else {
    $raw_headers = trim($output);
}

$response_data = [
    'status' => $is_http3_success ? 'success' : 'failure',
    'protocol' => $is_http3_success ? 'HTTP/3' : 'Failed',
    'message' => $response_status_message,
    'details' => $raw_headers,
];

echo json_encode($response_data);

?>
第三步:Nginx 配置和测试
Nginx 只需要确保它能将对 check.php 的请求正确转发给 PHP-FPM 处理即可。
3.1 Nginx 配置确认
确保 Nginx 网站配置(例如 /etc/nginx/sites-enabled/http3.conf)中包含正确的 PHP 处理器块:
server {
    # ... 其他配置 ...

    location ~ \.php$ {
        # 确保 fastcgi_pass 指向正确的 PHP-FPM socket 或地址
        # 如果是 Ubuntu/Debian:
        fastcgi_pass unix:/var/run/php/php8.5-fpm.sock;
        # 如果是 CentOS/RHEL:
        # fastcgi_pass 127.0.0.1:9000;

        fastcgi_index index.php;
        fastcgi_param SCRIPT_FILENAME $document_root$fastcgi_script_name;
        include fastcgi_params;
    }

    location = /check-http3-api {
        rewrite ^ /check.php last;
    }

    # ... 其他配置 ...
}
3.2 重启服务
重启 Nginx 和 PHP-FPM 服务:
sudo systemctl reload nginx
sudo systemctl restart php8.5-fpm
七、Nginx配置模版
基本的配置模版为:
server {
    listen 80;
    listen [::]:80;
    server_name http3.xxx.cn;
    index index.php index.html index.htm;
    return 301 https://http3.xxx.cn$request_uri;
}

server {
    listen 443 ssl;
    listen [::]:443 ssl;
    listen 443 quic reuseport;
    listen [::]:443 quic reuseport;

    root /var/www/http3;
    server_name http3.xxx.cn;

    http2 on;

    index index.htm index.html;

    #ssl_protocols TLSv1.3;
    ssl_certificate     certs/http3.xxx.cn/http3.xxx.cn_bundle.pem;
    ssl_certificate_key certs/http3.xxx.cn/http3.xxx.cn.key;

    location / {
        try_files $uri $uri/ $uri.html =404;
        add_header Alt-Svc 'h3=":443"; ma=86400';  # 必须的头部信息
    }

    # PHP-FPM
    location ~ \.php$ {
        include snippets/fastcgi-php.conf;
        include fastcgi_params;
        fastcgi_pass unix:/run/php/php8.5-fpm.sock;
        fastcgi_param PATH_INFO $fastcgi_path_info;
    }

    # 必须的后端API转发
    location = /check-http3-api {
        rewrite ^ /check.php last;
    }

}
八、测试
访问网站吧~
提醒
由于HTTP/3是基于QUIC的UDP协议实现的,也就是服务器的UDP端口必须打开。
还有就是第一次握手大概率是基于TCP的HTTP/2访问,识别到头部信息支持QUIC后,会在下次优先使用HTTP/3进行访问,因此,如果一次访问不成功,可以关闭浏览器或者清空缓存重新访问。
总结
前前后后用了大概一天多的时间,大致可以分为两部分:
第一部分: 前端页面制作
第二部分: 后端cURL with HTTP/3 的搭建
如果是纯前端页面的话太简单了,难点在编译支持HTTP/3的cURL上面,在这方面卡了我很长时间,最终自己查阅官方文档才搞定。
HTTP/3的普及其实非常一般,很多知名公司的网站仍然采用HTTP/2的标准,毕竟基于TCP协议的传输非常可靠,不会造成丢包,甚至比如Nginx的官网这种纯前端架构,仍然使用HTTP/1.1。
因此,HTTP/3只是尝鲜体验,对于内容简单的网站提升有限,但是当网站有一定规模之后,为了保持网站的稳定可靠运行以及访问者的体验,更倾向于基于TCP协议的HTTP/2。
如何取舍,未来会给我们答案。